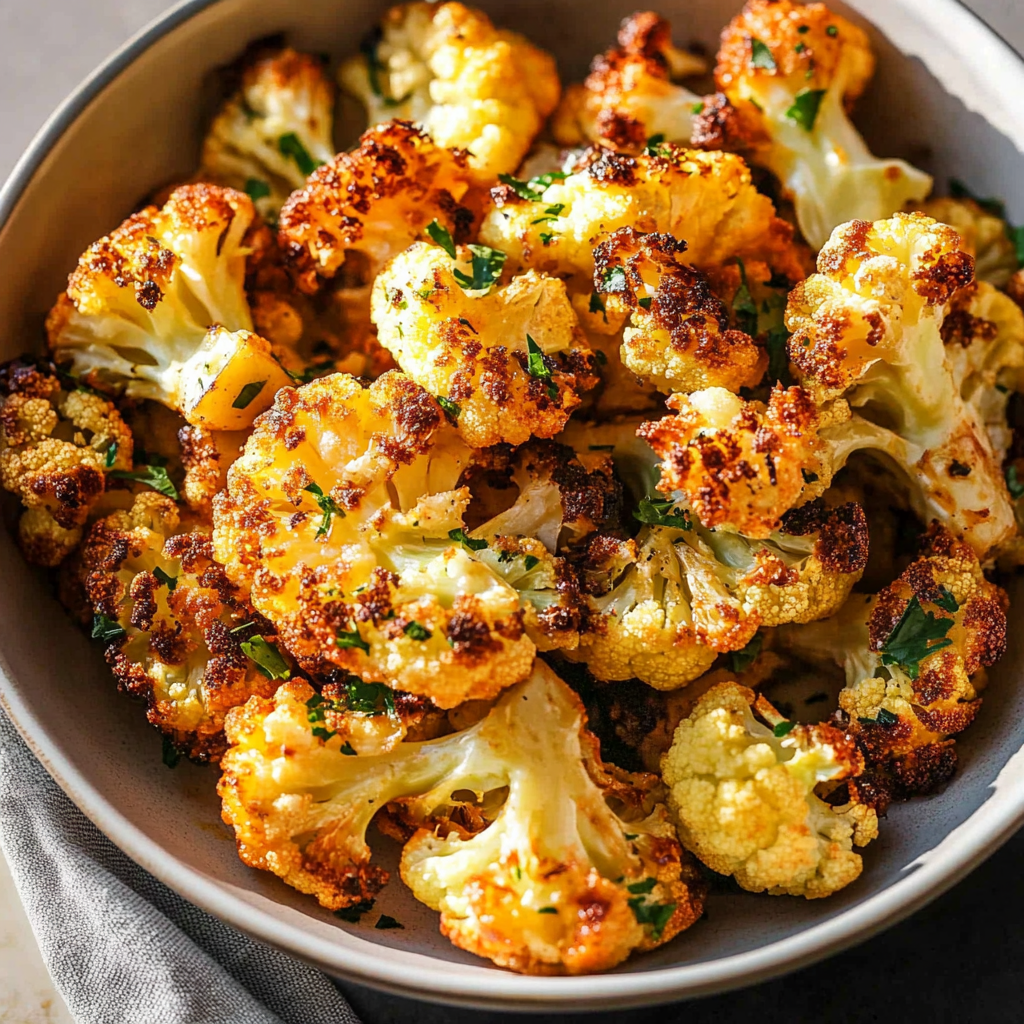
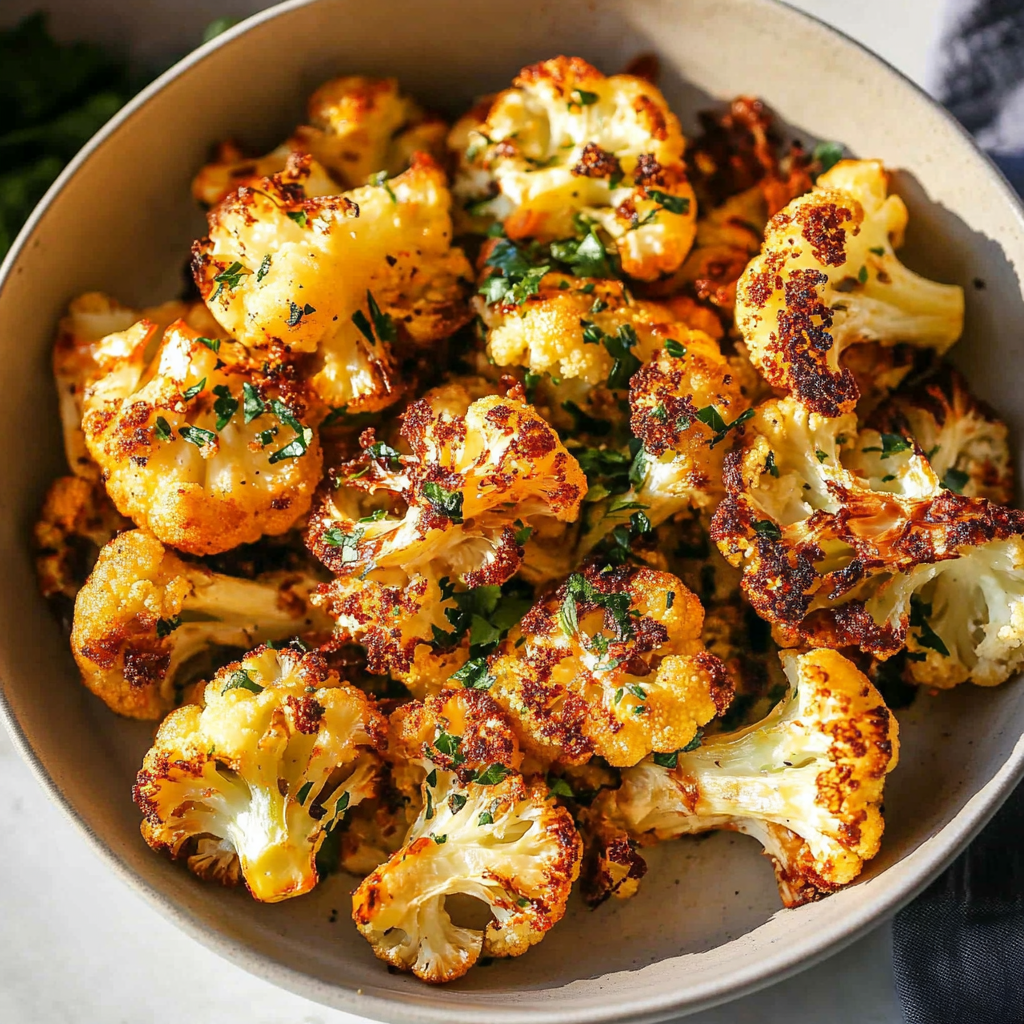
Baked cauliflower
Craving something crispy, golden, and totally addictive—but trying to eat more veggies? You’re in for a treat. This Baked Cauliflower recipe delivers that crunchy, savory bite you love without any of the guilt. It’s the kind of dish that’ll make even the most dedicated meat lover do a double-take. Perfect for busy weeknights or family gatherings, this dish turns a humble veggie into a dinnertime superstar!
Why You’ll Love This Recipe
- Easy to Make: With just a few simple steps, you can enjoy a delicious side dish.
- Family-Friendly: This baked cauliflower is sure to win over even the pickiest eaters at your table.
- Versatile: Pair it with your favorite dips or serve alongside any main course!
- Healthy Crunch: Satisfy that craving for something crispy while still eating your veggies.
- Make-Ahead Friendly: Prep it in advance and pop it in the oven when you’re ready!
Ingredients You’ll Need
You’ll love how simple and wholesome these ingredients are! They come together to create the perfect crispy roasted cauliflower that’s full of flavor.
For the Baked Cauliflower
- 1 head of cauliflower (chopped into bite-sized florets)
- 2–3 tablespoons olive oil
- Salt and black pepper (to taste)
- 1 teaspoon garlic powder
- ½ teaspoon paprika
- Grated Parmesan cheese (optional – for that nutty, cheesy finish)
Variations
This baked cauliflower recipe is wonderfully flexible! Feel free to mix things up with these fun variations:
- Add Some Spice: Toss in a pinch of cayenne pepper for some heat.
- Herb It Up: Add fresh herbs like rosemary or thyme before roasting for an aromatic twist.
- Cheesy Delight: Swap grated Parmesan with nutritional yeast for a vegan cheesy flavor.
- Lemon Zest: A sprinkle of lemon zest before serving brightens up the flavors beautifully.
How to Make Baked Cauliflower
Step 1: Preheat the Oven
Set your oven to 425°F (220°C). This high heat is key for getting that golden crispiness. Preheating ensures that our cauliflower roasts evenly and develops those lovely charred edges.
Step 2: Prepare Your Cauliflower
Place your cauliflower florets in a large bowl and drizzle them with olive oil. Season generously with salt, black pepper, garlic powder, and paprika. Using your hands or tongs, toss everything until each floret is well-coated. This step is important because it helps all those seasonings stick and infuse flavor into every bite.
Step 3: Spread and Roast
Line your baking sheet with parchment paper for easy cleanup. Spread the cauliflower out in a single layer—no overlapping! This allows each piece to roast evenly, giving you that perfect crunch.
Step 4: Bake to Perfection
Roast your cauliflower for 25–30 minutes, flipping once halfway through. Keep an eye on it; you’re looking for crisp edges and a golden hue. The high heat will bring out its natural sweetness while achieving that delightful crunch we all crave.
Step 5: Add Cheese (Optional)
If you’re using Parmesan cheese, sprinkle it on during the last 5 minutes of baking. It will melt and crisp up beautifully, adding an irresistible nutty flavor that’s hard to resist!
Step 6: Serve and Enjoy
Serve hot—straight from the oven is best! A little dip on the side never hurts either; think ranch or garlic aioli for extra deliciousness. Enjoy this baked cauliflower as a standout side dish at dinner!
Pro Tips for Making Baked Cauliflower
Ready to take your baked cauliflower to the next level? These handy tips will ensure you’re on your way to perfecting this delicious dish!
- Choose a fresh head of cauliflower: A vibrant, firm cauliflower will yield the best texture and flavor. Fresh produce makes all the difference in your final dish!
- Don’t skimp on the oil: While you want to avoid soaking your florets, a good drizzle of olive oil is essential for achieving that crispy texture. It helps with browning and enhances flavor.
- Experiment with spices: Feel free to mix it up! Try adding cumin, chili powder, or even a squeeze of lemon juice for a zestier kick. Variety keeps things exciting!
- Use parchment paper: This simple step ensures that your cauliflower doesn’t stick and allows for easy cleanup. Plus, it helps achieve that golden crispiness.
- Let them cool slightly before serving: Allowing the roasted cauliflower to sit for a few minutes after baking enhances its flavor and makes it easier to handle.
How to Serve Baked Cauliflower
Serving baked cauliflower is all about presentation and pairing it with complementary flavors. Here are some delightful ways to elevate this dish!
Garnishes
- Fresh herbs: Chopped parsley or cilantro sprinkled on top adds a pop of color and freshness that brightens up every bite.
- Lemon wedges: A squeeze of fresh lemon juice right before serving adds a tangy brightness that pairs wonderfully with the savory flavors.
- Chili flakes: For those who enjoy a bit of heat, sprinkle some chili flakes over the top for an extra kick.
Side Dishes
- Quinoa salad: A light quinoa salad with cherry tomatoes, cucumber, and feta cheese provides a refreshing contrast and balances out the richness of the roasted cauliflower.
- Garlic mashed potatoes: Creamy garlic mashed potatoes complement the crunchiness of baked cauliflower while adding comforting flavors to your meal.
- Grilled chicken skewers: Juicy grilled chicken skewers make for a satisfying protein addition that pairs beautifully with the veggie medley.
- Mixed greens salad: A simple mixed greens salad dressed with vinaigrette offers a crisp and refreshing side that lightens up the plate.
With these tips and serving ideas in hand, your baked cauliflower is sure to be a hit at any dinner table! Enjoy exploring this versatile dish in your kitchen.
Make Ahead and Storage
This Baked Cauliflower recipe is fantastic for meal prep! You can whip up a batch at the beginning of the week and enjoy it multiple times without losing its delightful crunch. Here’s how to store and make the most of your leftovers.
Storing Leftovers
- Store leftover baked cauliflower in an airtight container in the fridge.
- It will stay fresh for about 3-4 days.
- To keep it crispy, avoid stacking too many florets on top of each other.
Freezing
- Allow the baked cauliflower to cool completely before freezing.
- Place it in a freezer-safe bag or container, ensuring as much air as possible is removed.
- It can be frozen for up to 2-3 months—just label the container with the date!
Reheating
- For best results, reheat your baked cauliflower in the oven at 375°F (190°C) for about 10-15 minutes until heated through and crispy again.
- Alternatively, you can use an air fryer for a quick reheat that brings back that crunch!
FAQs
Here are some common questions you might have about this delicious baked cauliflower recipe.
Can I use frozen cauliflower for baking?
Yes! You can definitely use frozen cauliflower florets. Just make sure to thaw and dry them thoroughly before tossing in oil and seasonings to ensure they roast evenly.
What makes this baked cauliflower so crispy?
The high oven temperature (425°F or 220°C) combined with the olive oil is key to achieving that perfect crispy texture. Tossing the florets ensures they are evenly coated, leading to delicious caramelization.
Can I add different seasonings to my baked cauliflower?
Absolutely! Feel free to experiment with spices like cumin, turmeric, or even some chili powder for a kick. The base recipe is versatile and allows for lots of flavor variations!
How can I serve baked cauliflower?
Baked cauliflower makes a great side dish but can also be tossed into salads, served over grains, or even blended into soups for added creaminess and flavor.
Final Thoughts
I hope you’re as excited as I am about this Baked Cauliflower recipe! It’s not only easy to prepare but also a wonderful way to enjoy a veggie-packed dish that everyone will love. Whether you’re serving it at dinner or enjoying it as a snack throughout the week, this crunchy delight is sure to impress. Happy cooking, and I can’t wait for you to give it a try!
Baked Cauliflower

Indulge in a guilt-free delight with this Baked Cauliflower recipe that transforms humble cauliflower into a crispy, golden side dish everyone will love. Perfect for busy weeknights or family gatherings, this simple yet flavorful recipe is not only satisfying but also packed with nutrients. Whether you serve it alongside grilled chicken or as part of a veggie platter with your favorite dips, this baked cauliflower will impress even the pickiest eaters at the table. With easy preparation steps and versatile variations, you can create a dish that’s uniquely yours while enjoying the health benefits of delicious veggies.
- Prep Time: 10 minutes
- Cook Time: 30 minutes
- Total Time: 40 minutes
- Yield: Approximately 4 servings 1x
- Category: Side Dish
- Method: Baking
- Cuisine: Vegetarian
Ingredients
- 1 head of cauliflower (chopped into bite-sized florets)
- 2–3 tablespoons olive oil
- Salt and black pepper (to taste)
- 1 teaspoon garlic powder
- ½ teaspoon paprika
- Grated Parmesan cheese (optional)
Instructions
- Preheat your oven to 425°F (220°C) to achieve that perfect crispiness.
- In a large bowl, combine cauliflower florets with olive oil, salt, black pepper, garlic powder, and paprika. Toss until well-coated.
- Line a baking sheet with parchment paper and spread the cauliflower in a single layer.
- Roast for 25–30 minutes, flipping halfway through, until crispy and golden brown.
- If using Parmesan cheese, sprinkle it on during the last 5 minutes of baking for added flavor.
- Serve hot with your favorite dip.
Nutrition
- Serving Size: 1 cup (about 150g)
- Calories: 120
- Sugar: 2g
- Sodium: 240mg
- Fat: 8g
- Saturated Fat: 1g
- Unsaturated Fat: 7g
- Trans Fat: 0g
- Carbohydrates: 10g
- Fiber: 4g
- Protein: 4g
- Cholesterol: 0mg